QUARTZ ALARM CLOCK WITH ILLUMINATED DIAL OPERATING INSTRUCTIONS
Posted on January 2, 2017 | By Customers
HOWARD MILLER
QUARTZ ALARM CLOCK WITH ILLUMINATED DIAL
OPERATING INSTRUCTIONS

STARTING
A battery is included with your clock. To start your clock:
- Open or remove the cover on the back of the clock
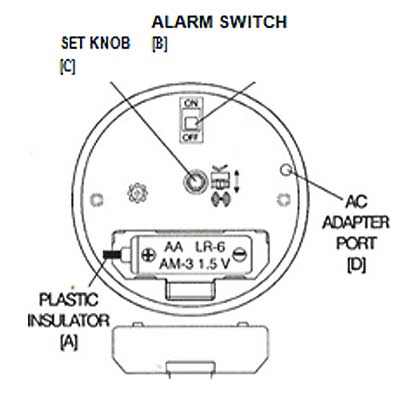
- Remove the plastic insulator [A) which is included to preserve battery life in storage.
- If the clock does not start, check that the battery is correctly installed and that the (+) and (-) symbols on the battery match those in the battery holder.
TIME SETTING
- Slide the Alarm Switch [BJ, to the OFF position.
- Pull out and turn the Set Knob [C], to set the hands
to the correct lime. - After setting the time, push the set knob back in to
insure accurate timekeeping.
ALARM SETTING
- Slide the Alarm Switch to the OFF position
- Make sure the Set Knob is pushed in.
- Turn the Set Knob until the alarm hand is set to the
desired alarm time. - Slide the Alarm Switch to the ON position.
DIAL LIGHT
Plug the adapter for the light into AC Adapter Port [D)
on the back of the clock.
NOTE: The adapter is for the dial light only and must be plugged in for the light to work.
.
BATTERY REPLACEMENT
When the clock stops or the alarm volume weakens,
replace the battery with a fresh 1.5 v “AA’ size battery.
Alkaline batteries are recommended for longer battery
life.
customer comment
Hi Robert,
Thanks for your quick response to our order!
Again, we so appreciate the service we have received each time with your company!
Sincerely,
Sue L.


Recent Comments